Installing a fibreglass pool is exciting, but poor ground preparation can cause serious problems like cracking, shifting, or water damage. Many homeowners underestimate the importance of this step for a safe and lasting pool.
Ignoring proper ground prep leads to costly repairs and frustration. Pools can move or settle unevenly if the soil isn't stable or the dig sheet isn't followed. Without careful planning, your dream pool might turn into a maintenance headache.
This article walks you through the essential steps to prepare your ground correctly. From site checks to excavation and base work, you'll learn what it takes to set a strong foundation for your fibreglass pool.
Highlights
- Proper ground preparation is necessary to prevent pool movement, cracking, and water damage.
- Site investigation includes soil testing, checking underground utilities, and ensuring equipment access to avoid issues during pool installation.
- Obtaining council approval and a detailed site plan is required to comply with local regulations and secure permits for your fibreglass pool.
- Clearing and marking the site accurately, following the site plan, ensures correct pool placement and prevents mistakes during excavation.
- Excavation must match the pool's shape with proper clearances, considering soil type and stability to provide a solid foundation.
- Base preparation involves creating a flat, stable, and free-draining bedding layer to support the pool shell and prevent uneven settling.
Understanding Ground Preparation
Getting the ground ready for a fibreglass pool is a big job, but it is one of the most important steps. If you rush this part, especially if you're having a DIY fibreglass pool installation, you could end up with a pool that moves, cracks, or even pops out of the ground.
When we talk about ground preparation, we mean everything that happens before the pool shell goes in. This includes checking the soil, making sure water can drain away, and digging the right hole. It is not just about digging and dropping the pool in. The ground needs to be strong and stable, so the pool stays in place for many years.
Every backyard is different. Some have sandy soil, some have clay, and some have rocks. Each type of ground needs a different approach, which is why preparing the ground depending on the nature of your backyard is very important.
So ground preparation is not just about digging a hole. It is about making sure the pool has a safe, dry, and stable place to sit. This helps avoid future headaches and keeps your pool looking great and working well for a long time.
Importance of Proper Ground Preparation
Preparing the ground properly for a fibreglass pool is a technical process that ensures the pool shell sits on a stable, well-drained base. But it doesn't end there. It also:
- Stops pool movement and sinking. If the ground is not prepared well, the pool can shift or settle over time. This can lead to cracks or leaks, which are expensive to fix.
- Protects against water problems. Good ground prep helps water drain away from the pool. This stops water from building up under the pool, which can push the shell up or cause it to float.
- Makes the pool last longer. A solid base and the right backfill keep the pool in place for many years. It leads to fewer repairs and less worry about the pool shell moving or cracking.
- Keeps the pool level and looking good. If the ground is not flat and stable, the pool can end up uneven. This does not just look bad - it can also make the water level uneven and cause problems with the pool equipment. Proper ground preparation especially for sloped backyards is a must.
- Follows safety and building rules. Proper ground preparation is needed to meet council rules and Australian Standards. This helps make sure the pool is safe for everyone and avoids trouble with inspections.
- Saves money in the long run. Fixing a pool that has moved or cracked because of poor ground prep can cost a lot. Doing the job right the first time helps avoid these extra costs.
How to Prepare the Ground for Fibreglass Pool Installation
If you are reading this, you have probably already picked out your fibreglass pool. Now you want to know what happens next, or maybe you are thinking about doing some of the work yourself. Either way, understanding the ground preparation process is important.
We will walk through each stage, from checking the site to getting it ready for the pool shell.
1. Site Investigation and Assessment
First of all, let's assume you have already chosen your fibreglass pool shape and size based on your backyard size. And before you start any paperwork or digging, you need to check your site before installing your fibreglass pool, whether you want to do the work yourself or just want to understand what the professionals are doing.
Site investigation involves examining the soil, checking for underground water, and identifying any potential risks that could impact your pool later.
First, you need to know what type of soil you have. Sandy soil drains well but might need extra support. Clay can swell and shrink, which can move the pool shell if not managed properly. Rocky ground can make digging harder and may need special equipment.
If you are not sure, a soil test can help. This test shows if the ground is stable and if there are any problems like high water tables or reactive clay, or the type of soil that changes a lot with wet and dry weather.
You also need to look for things like old pipes, tree roots, or underground cables. In Australia, you can contact Before You Dig Australia or BYDA. It is a free service that can help you identify the location of buried utilities on your land - water pipes, gas lines, electric cables, telecommunications, and sewer pipes.
You also need to think about how the equipment will get to your backyard. A clear path between 2.5 and 3 metres wide is best for delivery trucks and diggers, but the smallest machines can fit through a gap as narrow as 900 mm. Before you start, check your access points and measure any gates or side paths to avoid surprises on the day.
After these, you should consult with your local council or a building certifier as soon as possible.
2. Get Council Approval and Site Plan
Once you have completed the site investigation and know your ground conditions, the next step is to get council approval and prepare a site plan. Local councils have rules about where and how you can install a pool which cover minimum distances from property boundaries, buildings, and underground services like pipes and cables.
The first thing to do is submit your pool plans to the council. These plans should show the exact spot where the pool will sit, the size and shape of the pool, and how far it is from fences, houses, and other buildings. The council will also want to see details about pool fencing and drainage.
Most DIY pool kits, like what we have here at Pool Professionals Mackay, come with certified engineering plans and documents that show your pool meets Australian Standards.
And to get your pool permit, you will need a site plan. This plan shows where your pool will go in your yard, how close it is to your house and fences, and where any pipes or cables are buried. If you are not sure what is needed, your pool supplier or a local pool builder can help you get the paperwork right, or you can use your own draftsman if you prefer.
Once you have approval, you will get a stamped site plan.
When you are ready, submit your application to your local council. Council approval can take up to 12 weeks, depending on where you live. If you want things to move faster, a private certifier is a good option. Most private certifiers can approve pool permits in as little as 2 weeks.
3. Clear and Mark the Site
Once you have your council approval and site plan, the next step is to clear anything that could get in the way of the pool installation and mark the site.
Start by taking out plants, rocks, old paving, or any garden features in the pool area. If there are tree roots or stumps, these should be dug out fully, as they can cause problems later. Make sure the area is free from rubbish and loose soil.
Once cleared, the exact position of the pool is marked on the ground. This marking follows the approved site plan and shows the pool's outline, excavation boundaries, and any important reference points.
Use string lines, spray paint, or pegs to mark the pool's shape and position on the ground. Double-check your measurements before any digging starts to avoid costly mistakes later on.
If your site is sloped or uneven, use a builder's level or laser level to mark out the pool area at the right height. This helps you see where soil may need to be cut or filled. After doing all these, it's time to excavate.
4. Excavation
Excavation is the process of digging the hole where your fibreglass pool will sit. It needs to be done carefully to match the shape and size of the pool shell, with some extra space around the edges.
If you have a pool builder, they already know what to do in the excavation. But in case you have a DIY pool kit, most pool sellers provide detailed excavation plans or dig sheets that follow the exact dimensions and shape tailored to your fibreglass pool shape and size.
Typically, there should be at least 100 mm clearance on the sides and 75 mm under the pool to allow for bedding and backfill materials. This space helps keep the pool stable and allows for proper drainage in the long run.
The excavation must follow the contours of the pool closely to avoid voids or uneven support. In some cases, especially on reactive clay soils, the excavation profile may need to be adjusted to reduce the risk of movement. If the hole is deeper than 150 mm under the pool base, the extra base fill should be compacted or stabilised before placing the pool.
Temporary or permanent support may be required if the excavation is near existing structures or in unstable soil to prevent the sides of the hole from collapsing and protect nearby buildings or services. Always ensure the excavation is done safely and according to any local regulations.
In connection with excavation, confirm with your pool builder or excavator whether soil removal is included in your quote. If not, and you need help disposing of large amounts, you may visit Fill Wanted to find soil removal services from local suppliers.
As a pro tip, we recommend not digging the hole more than two weeks before your planned pool installation. Waiting until closer to the install date helps prevent problems like the sides caving in, water collecting in the hole, or having to redo the excavation if rain or loose soil causes changes.
5. Base Preparation
Once the excavation is complete, the next thing to do is to prepare a solid, level base to support the fibreglass shell. The base needs to be flat, stable, and free-draining to keep the pool level and stop water from building up under the shell.
The most common materials used for the base here in Mackay are crusher dust, washed river sand, or similar free-draining materials. The sand should be evenly graded and have a maximum aggregate size of 7 mm to facilitate screeding and aid in water drainage.
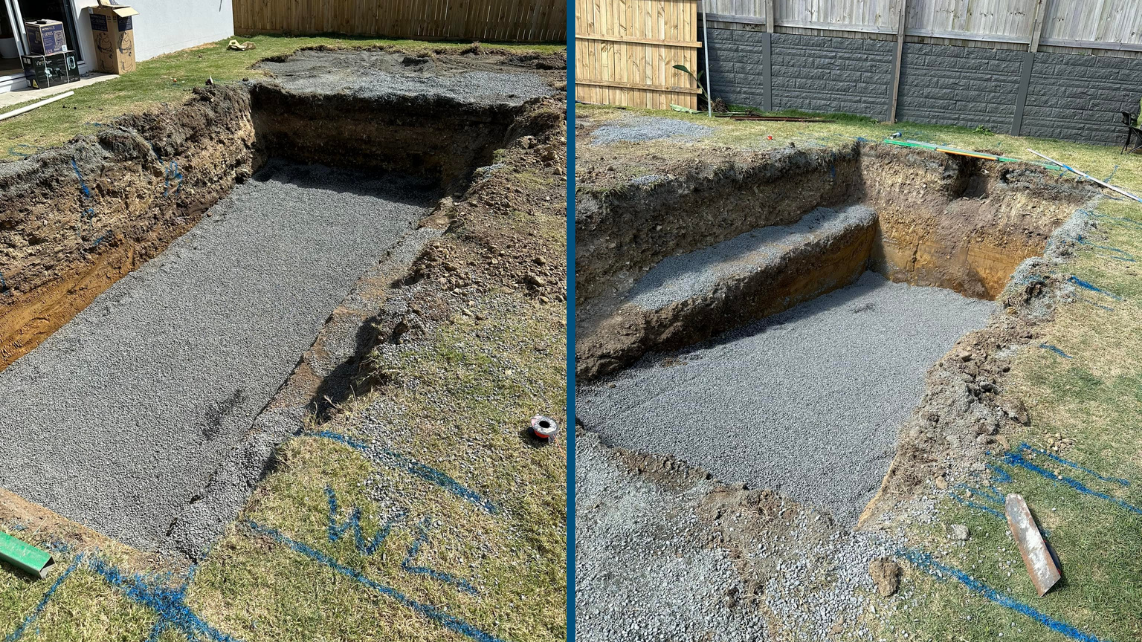
As mentioned, a layer of bedding at least 75 mm thick is placed at the bottom of the hole. This layer should be spread out evenly and shaped to match the pool's contours. If the base is not flat, has soft spots, or is poorly compacted, the pool can settle unevenly or crack.
In some cases, especially with reactive clay soils, you might need to over-excavate and fill with non-reactive material to reduce movement. The bedding also acts as a drainage layer to help groundwater flow to any installed hydrostatic valve or standpipe.
Before placing the pool shell, double-check that the base is level and compacted. Any dips or bumps can cause problems later. A well-prepared base is key to a strong and safe fibreglass pool installation.
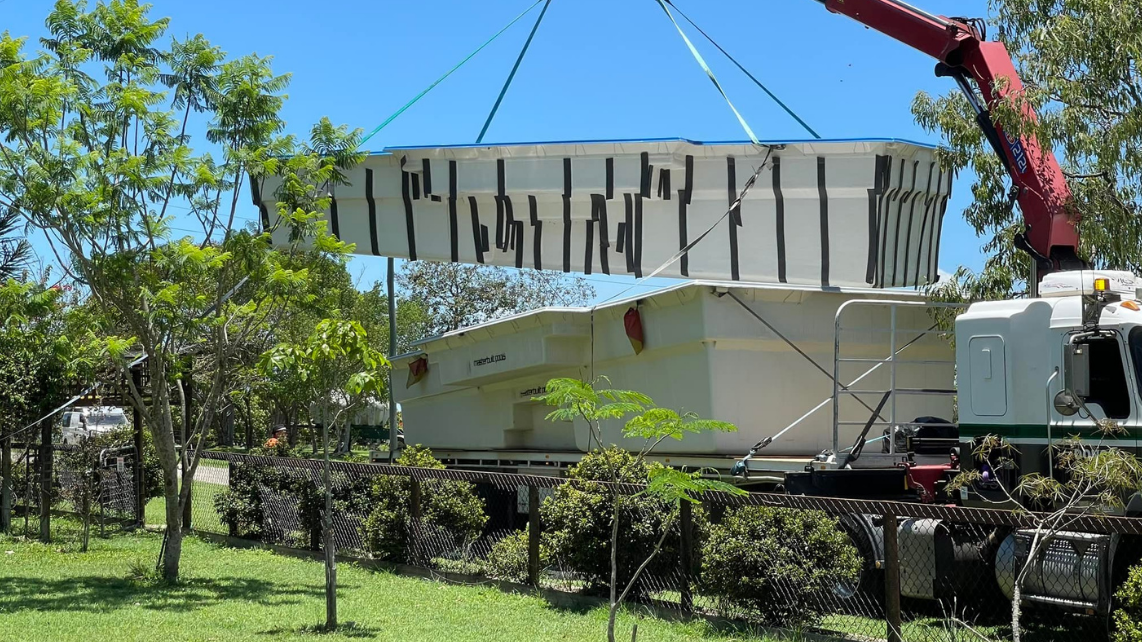
6. Prepare for Pool Shell Placement and Other Works
After the ground is prepared and the base is ready, it's time to get set for placing the pool shell. The shell is delivered and carefully lowered into the excavation, making sure it sits level and fits the space with the right clearances. This step needs a steady hand and the right equipment to avoid damaging the shell or the site.
Once the shell is in place, other works can begin. These include backfilling around the pool with approved materials, setting up the bond beam for the coping, and getting the plumbing and electrical connections ready. You might also start planning for fencing, paving, or landscaping, but these are usually done after the pool is secure and filled with water.
Final Thoughts
Getting the ground prepared properly and carefully is as important as choosing your fibreglass pool. Detailed planning and following each step will help you avoid pricey mistakes and keep your pool in top shape for years.
When you are unsure about any part of the process - even if it's just about markings and measurements - always ask a local pool expert. A quick check now can save you a lot of trouble later and make sure your pool is set up the right way from the start.
If you ever need help with your fibreglass pool project, just reach out to us. We are licensed installers with years of experience installing fibreglass pools in Mackay, and we're happy to chat or give you a quote.
And if you're still thinking about which fibreglass pool to choose, check out the fibreglass pool designs our partner offers. There's always something for every backyard and budget.